

The Problem
Leverture was approached by a now-client with the challenge to update our client’s monolithic legacy application to a microservices architecture. As part of the rewrite, we upgraded their authorization and authentication protocols by implementing Auth0. However, in their legacy application, the customer service personnel had the ability to impersonate users in order to help them work through problems they were encountering. Based on the client’s business needs, this feature was integral to their product offering and so was an absolute “must have” in the new microservices environment too. There’s just one problem… while Auth0 used to support user impersonation for use cases like customer servicing, Auth0 had recently discontinued the feature. That left us in the less-than-stellar predicament of having to figure it out on our own.
Possible Solution
The first possible solution is relatively simple, but dangerously shortsighted. To wit, since all the information would be stored in a class, you could simply add an impersonating flag and additional user properties to that class. When the system encounters the impersonating flag, you can just use the additional properties to implement the impersonation.
This is both feasible and will almost assuredly get the job done… but it isn’t a great idea. You will most likely make the application harder to both maintain and test in the future. Plus, you’ll end up having to add a significant amount of code via conditional statements littered throughout your application to check the impersonation flag. This seems like quite the nightmare for either yourself or some other unsuspecting programmer down the road. Let’s do better than that, shall we?!
Solution
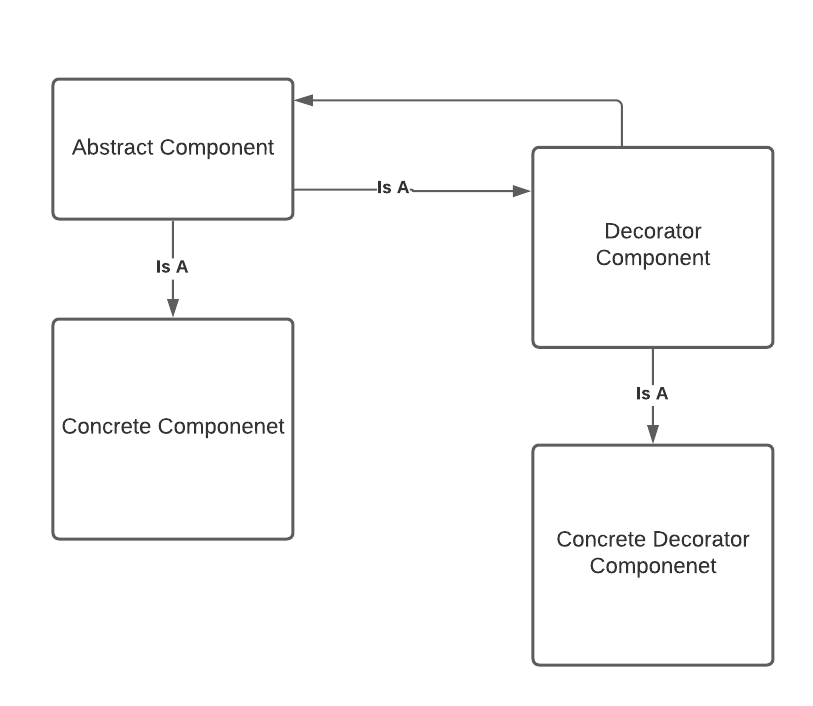
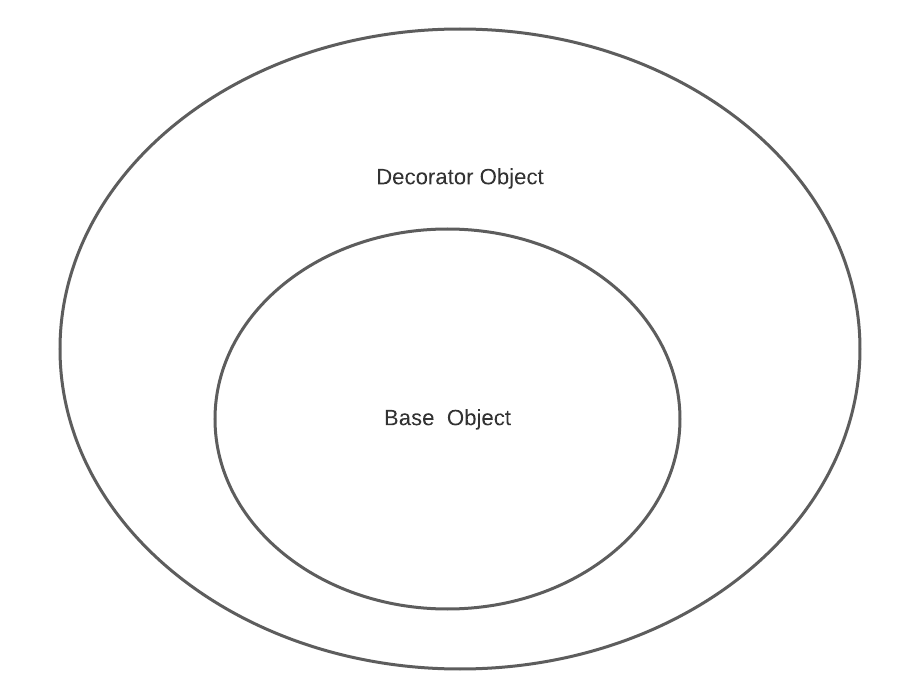
A more elegant approach would be to find a design pattern that solves the problem for you. As in all things software, intentional, proper design will make the software easier to maintain. For this particular use case, I recommend using the decorator pattern; it’s a structural pattern that allows you to add responsibilities dynamically to an object. It consists of: a component, a concrete class and a decorator class that is both a component while also having a component. You are effectively wrapping the concrete class with another class that allows you to add functionality to it.
FLOW
While that may appear confusing, going through the flow will demonstrate its elegance. First, the customer service representative will choose to impersonate a user; then, an API call will be made to Auth0 to add an impersonation user ID to their user_meta_data in Auth0. Next, we will need to redirect to the customer’s application. The customer service representative will be logged in as themselves, but the application will check for the impersonation ID in the user meta data. If the ID is present, we will need to call the Auth0 API to get that user’s information and then override the logged-in customer service representative information.

The POC
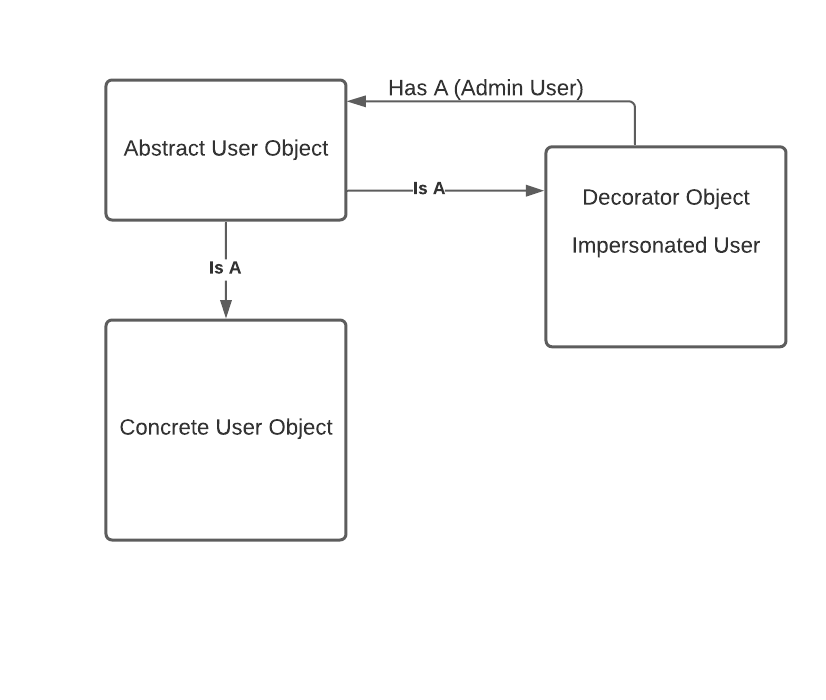
As you can see from the UML diagram above, we are going to build an Abstract User Object, a Concrete User Object and Decorator Object Impersonated User. Let’s start by building our abstract User Object:
using System;
using System.Collections.Generic;
using System.Linq;
using System.Text;
using System.Threading.Tasks;

namespace impsersonationDemo.User_Objects
{
    public abstract class BaseUser
    {
        public string fullname { get; set; }
        public List<string> permissions { get; set; }
        public  int userId { get; set; }
        public virtual  void LogStatement()
        {
            Console.WriteLine($"{userId} {fullname} has logged in!");
        }
    }

}
In the BaseUser abstract class, we have all the information relevant to the user. We have the name, permissions and User ID as well as a log statement. Then, we’ll create a concrete implementation of this abstract class.
using System;
using System.Collections.Generic;
using System.Linq;
using System.Text;
using System.Threading.Tasks;

namespace impsersonationDemo.User_Objects
{
    public class GenericUser : BaseUser
    {
        public GenericUser(int userId, string fullname, List<string> permission )
        {
            this.userId = userId;
            this.fullname = fullname;
            this.permissions = permission;
        }
    }
}
Now we can create our decorator class. As we said before, it is a BaseUser, but it also has a BaseUser. This is how this might look:
using System;
using System.Collections.Generic;
using System.Linq;
using System.Text;
using System.Threading.Tasks;

namespace impsersonationDemo.User_Objects
{
    public class ImpersonatedUser : BaseUser
    {
        private BaseUser adminUser;
        private int _userUserId;
        public ImpersonatedUser(BaseUser user , BaseUser AdminUser)
        {
            adminUser = AdminUser;
            this.fullname = user.fullname;
            this.permissions = user.permissions;
            this.userId = adminUser.userId;
            _userUserId = user.userId;
        }

        public override void LogStatement()
        {
            Console.WriteLine($"{adminUser.userId} { adminUser.fullname } is impersonating {_userUserId} {fullname} ");
        }
    }
}
As you can see, this is different from the GenericUser class because in the constructor, we are passing in a User object and an Admin User object. This allows us to add the functionality to the User and effectively take over the impersonated user’s identity while also keeping the Admin User’s information. I am driving this point home by using both the admin user and impersonated user’s information in the overridden LogStatement method.
using impsersonationDemo.User_Objects;
using System;
using System.Collections.Generic;

namespace impsersonationDemo
{
    class Program
    {
        static void Main(string[] args)
        {
            ConsoleKeyInfo clinicKey;

            //Initialize User List
            var permissions2 = new List<string>();
            permissions2.Add("isAdmin");
            permissions2.Add("read:A");
            permissions2.Add("read:B" );
            permissions2.Add("read:C" );
            permissions2.Add("read:D");
            var adminUser = new GenericUser(400,"Sally Admin", permissions2);

            permissions2 = new List<string>();
            permissions2.Add("read:A");
            permissions2.Add("read:B");
            permissions2.Add("read:C");
            var user1 = new GenericUser(12,"Gerry User", permissions2);

            permissions2 = new List<string>();
            permissions2.Add("read:A");
            permissions2.Add("read:B");
            var user2 = new GenericUser(50, "Mary Maid", permissions2);

            permissions2 = new List<string>();
            permissions2.Add("read:A");
            var user3 = new GenericUser(70, "John Smith", permissions2);
            do
            {
                Console.WriteLine();
                Console.WriteLine($"Welcome to the Customer Service screen {adminUser.userId} {adminUser.fullname},  You have the following permissions {String.Join(",", adminUser.permissions)}");
                Console.WriteLine();
                Console.WriteLine("Here is a list of users");
                Console.WriteLine($"Press 1 - {user1.userId} {user1.fullname}  {String.Join(",", user1.permissions)}");
                Console.WriteLine($"Press 2 - {user2.userId} {user2.fullname}  {String.Join(",", user2.permissions)}");
                Console.WriteLine($"Press 3 - {user3.userId} {user3.fullname}  {String.Join(",", user3.permissions)}");
                Console.WriteLine($"Press 4 - Go directly to Clinic Portal as your self");
                BaseUser impsonatedUser = adminUser;
                Console.WriteLine();
                var key = Console.ReadKey();
                switch (key.Key)
                {
                    case ConsoleKey.D1:
                    case ConsoleKey.NumPad1:
                        impsonatedUser = new ImpersonatedUser(user1, adminUser);
                        break;
                    case ConsoleKey.D2:
                    case ConsoleKey.NumPad2:
                        impsonatedUser = new ImpersonatedUser(user2, adminUser);
                        break;
                    case ConsoleKey.D3:
                    case ConsoleKey.NumPad3:
                        impsonatedUser = new ImpersonatedUser(user3, adminUser);
                        break;
                    case ConsoleKey.D4:
                    case ConsoleKey.NumPad4:
                        impsonatedUser = adminUser;
                        break;
                    default:
                        break;
                }
                Console.WriteLine();
                Console.WriteLine($"Welcome to the User Portal Home screen");
                Console.WriteLine();
                impsonatedUser.LogStatement();
                Console.WriteLine($"User Id {impsonatedUser.userId}");
                Console.WriteLine(impsonatedUser.fullname);
                Console.WriteLine( String.Join(",", impsonatedUser.permissions));
                Console.WriteLine();
                Console.WriteLine("What would you like to do?");
                Console.WriteLine($"Press 1 - finish impersonation");
                Console.WriteLine($"Press any other key - exit program");
                clinicKey = Console.ReadKey();

            } while (clinicKey.Key == ConsoleKey.NumPad1 || clinicKey.Key == ConsoleKey.D1);
            Console.WriteLine();
            Console.WriteLine("Good Bye");
        }
    }
}
In the above code block demonstrating how to use these classes, you can see that we are initializing each user as a generic user then displaying them in a list on the screen. When the admin user chooses a user to impersonate, we create an impersonated user by passing in the constructor the user information and the admin user’s information. Finally, we are logged into the User Portal as the impersonated user with their permissions and information. The 4th option allows the admin to just go straight to the user portal with their own permissions.
Final Implementation
While I haven’t implemented this yet, I feel like I’ve proven the concept will work. In order to get this to work in the real world, the customer service application will need to call the Auth0 API to add the impersonated user’s ID to the admin’s user meta data. From there we can navigate to the user application and a new token will be issued. If the user application sees that the impersonated user ID is present, you will call the auth0 management API again to get the impersonated user’s information and permissions. From there you will create the impersonated user-decorated object and work in the application.
Summary
We were able to implement this solution without modifying the user object. And because we’re using Design patterns to solve the problem, it will invariably make it easier to maintain your application. The decorator pattern allowed us to elegantly extend the concrete implementation by injecting it into the decorated object. And, for further reading/additional resources, check out the source code and a list I compiled below on design patterns and how to use them effectively:
Source Code
Resources
Design Patterns – Elements of Reusable Object Oriented Software
Head First Design Patterns – Building Extensible & Maintainable Object-Oriented Software
Youtube – Decorator Pattern – Design Patterns (Christopher Okhravi)